How to Edit the Hosts File in Windows 8.1
![]()
A "host" name is used by TCP/IP to identify a TCP/IP device on the network. What is a TCP/IP device? Well, every device that uses TCP/IP protocol to communicate on a network is considered a TCP/IP host. A computer, printer, tablet, and routers are all examples of TCP/IP devices. The HOSTS file in Windows (and other operating systems) is used to map host names to IP addresses. This allows communication over a TCP/IP network.
In previous versions of Windows, the hosts file was very easy to edit. In fact, it was so easy to edit that the bad guys started to use the file to do bad things to our computers by adding entries without our permission or knowledge. Those of us who are concerned about computer security started to make the HOSTS file read-only but the bad guys found ways to remove the read-only attribute and still were able to mess with the HOSTS file. In this article I won't focus on how to protect your HOSTS file, instead I want to show you how to edit the file in Windows 8/Windows 8.1 because editing this file is not so easy anymore. Thanks to Microsoft, the HOSTS file is more secure in Windows 8 and requires additional steps.
In Windows 8/8.1 you will get an access denied error when you edit the hosts file, even when you are logged in as an Administrator. You can also try to edit the hosts file by starting the Notepad as an Administrator while logged in as an Administrator. You will still get an access denied error. The only way I know is to save the file to another location and then copy it back to the original location. By default the HOSTS file resides in C:\Windows\System32\drivers\etc folder. The HOSTS file is one of the few files in Windows that don't have a file extension. When you edit the file make sure you do not save it as a .txt file or else it won't work. Here's the step-by-step procedure for editing the HOSTS file in Windows 8/8.1.
Editing the Hosts File
- Start Windows File Explorer and go to C:\Windows\System32\drivers\etc folder.
- Make a backup copy of hosts file by simply copying the hosts file and then pasting it. It will add a file called hosts_2. You might want to rename it something like hosts.old or hosts.original.
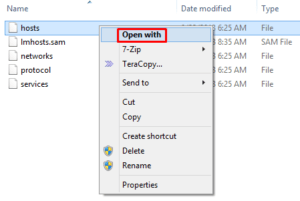
- Right-click the hosts file and select Open with.
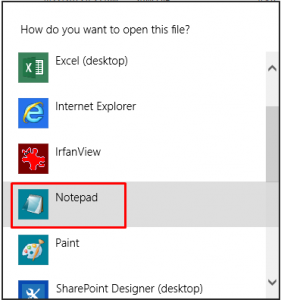
- Select Notepad from the choice of programs displayed for you. If you do not see Notepad in the list, scroll down to the bottom of the screen and click the hyperlink Look for another app on this PC.
- Enter the IP address and the host name for each host you want to add to this file. The graphic below shows an example of what the entry would look like. Do not use the address and server name in the example. It is only used for demonstration purposes.
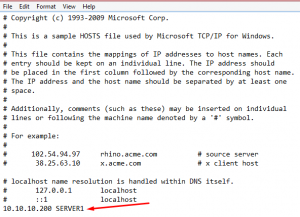
- Make sure there is no pound symbol (#) at the beginning of the entry or else it will be considered a comment and will be ignored by the system.
- On the menu, click File, Save.
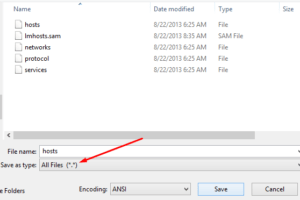
- Change the Save as type option to All Files (*.*) so that the file will be saved without an extension. The default option is Text Documents (*.txt) and it will add the .txt extension to the file, which we don't want.
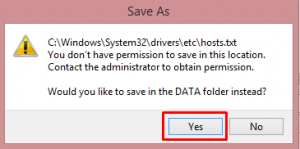
- When you click Save you will get a message similar to the one below that you don't have permission to save the file in this location. Click Yes and then save it to another location, like desktop or Documents folder.
WARNING! Just before you click Save make sure the Save as type option is set to All Files (*.*). I have noticed that when I click Yes it keeps the Save as type option as All Files (*.*) but it changes the file name to hosts.txt, which I don't want. Delete the .txt extension so your screen looks like the one in step 7 above and then click Save.
- Close Notepad.
- Navigate to the location where you saved the file. You may notice that even though you told Windows not to use a file extension it ignored your instruction and saved the file with a .txt extension. This is a Windows 8/8.1 (cough) "feature."
- Rename the file to hosts. Do not forget the s at the end. You will see the following prompt that if you change a file name extension, the file might become unstable. Click Yes.

- Copy the hosts file and then navigate back to C:\Windows\System32\drivers\etc folder.
- Paste the file in the etc folder.
- When prompted, replace the file with the newer file.
If you would like to learn more about Host and NetBIOS name resolution methods then check out this article: Host & NetBIOS Name Resolution Methods.
Copyright ©2014 Zubair Alexander. All rights reserved.
This div height required for enabling the sticky sidebar
We use cookies on our website to give you the most relevant experience by remembering your preferences and repeat visits. By clicking "Accept", you consent to the use of ALL the cookies.
How to Edit the Hosts File in Windows 8.1
Source: https://www.zubairalexander.com/blog/how-to-edit-hosts-file-in-windows-8-or-windows-8-1/
0 Response to "How to Edit the Hosts File in Windows 8.1"
Post a Comment